
Build a Cloud Compute Instance with Java Concepts
Ana-Maria Mihalceanu on July 16, 2024While infrastructure configuration management tools have been around since the 1970s, the rise in popularity of DevOps and cloud computing brought a new perspective to how we can all provision and maintain infrastructure using our favorite programming language. This post discusses how to build Oracle Cloud Infrastructure (OCI) Instances with Java and Oracle Cloud Infrastructure (OCI) provider for Pulumi.
⚠️ At the time of writing this article, Pulumi Java support is in public preview.
Goals and Prerequisites
Before getting started, let’s discuss what we want to achieve:
- Have a Java project running on a recent JDK release (JDK 21+) that builds one or more OCI instances.
- As environment parameters can vary, would be great to maintain them in one or more
.propertiesor.yamlconfiguration files.
There are several SDKs in the market that support building OCI components with Java, including an Oracle Cloud Infrastructure SDK for Java, but I have seen a few presentations about Pulumi at several conferences in 2023, so I thought to give it a try.
Here is the full lists of ingredients for the project:
- JDK 21
- Maven
- Pulumi CLI
- An Integrated Development Environment (IDE) of your choice, preferably one that has a Terminal integrated.
- An Oracle Cloud Infrastructure Account
Once you have the items above, you can proceed with initializing and customizing your project.
Step 1: Initial Setup
Every Pulumi project is deployed to a stack, meaning as an isolated and independently configurable entity. Each stack has its own state, and Pulumi uses it to know when and how to change cloud resources. Let’s create a home directory where you will store a state file and your stack source code, for example by running the following command in a terminal window:
mkdir oci-vm-provider
cd oci-vm-provider # next steps will be done inside this folder
In order to track changes on your infrastructure, Pulumi stores the state of your Stack in Pulumi Service or in a local state file. In this article, the state is stored in a local state file by running the following commands:
mkdir pulumi-state-local
pulumi login file://pulumi-state-local
Now we can generate a new Java project that uses maven by running:
pulumi new java --name oci-vm-provider --force # because current dir is not empty
The CLI will ask you a series of questions, for “stack name” enter oci-vm-provider to match the settings in this tutorial. For everything else you can just hit enter to choose the defaults.
Now you should have a Maven Java project configured to run with a minimum of Java 11.
Step 2: Maven Configuration
In order for the project to use the OCI provider for Pulumi, you’ll need to add it as a dependency. Don’t forget to set the oci.version in properties at the top, or uncomment the version below:
<dependency>
    <groupId>com.pulumi</groupId>
    <artifactId>oci</artifactId>
    <version>${oci.version}</version>
    <!--<version>1.41.0</version>-->
</dependency>
If you want to run your project with Java 21+, you must upgrade your maven-compiler-plugin version:
<plugin>
    <groupId>org.apache.maven.plugins</groupId>
     <artifactId>maven-compiler-plugin</artifactId>
     <version>3.11.0</version>
     <configuration>
         <source>${maven.compiler.source}</source>
         <target>${maven.compiler.target}</target>
     </configuration>
</plugin>
Step 3: Pulumi and Oracle Cloud Configuration
Pulumi.yaml is where Pulumi stores the name, runtime, and project description.
Pulumi.<stack-name>.yaml contains key-value pairs for credentials and other specific configuration options. In our case, the Pulumi.oci-vm-provider.yaml will contain credentials needed to authenticate to OCI as well as resource details (like amount of instances to create). Your file might be empty, in which case, you can copy what’s needed from here:
config:
  oci-vm-provider:amount_vm: 1
  oci-vm-provider:compartment_ocid: your-parent-compartment
  oci-vm-provider:operating_system: Oracle Linux
  oci-vm-provider:operating_system_version: "9"
  oci-vm-provider:routetable_displayname: demo_routetable
  oci-vm-provider:subnet_cidr: 10.0.0.0/28
  oci-vm-provider:subnet_displayname: demo_subnet
  oci-vm-provider:subnet_dns_label: demoendpoints
  oci-vm-provider:internetgateway_name: demo_internetgateway
  oci-vm-provider:ssh_authorized_keys: your-ssh-key
  oci-vm-provider:ssh_private_key_file: your-private-key-file
  oci-vm-provider:vcn_cidr_block: 10.0.0.0/16
  oci-vm-provider:vcn_display_name: demo_vcn
  oci-vm-provider:vcn_dns_label: demodns
  oci:fingerprint: encrypted-oci-fingerprint
  oci:privateKey: encrypted-oci-private-key-content
  oci:region: us-phoenix-1
  oci:tenancyOcid: encrypted-tenancy-ocid
  oci:userOcid: encrypted-user-ocid
Some of the values, such as oci-vm-provider:ssh_private_key_file, require you to modify them. You can do that manually, or by running pulumi config for each credential:
# you will need the passphrase when encrypting configurations
export PULUMI_CONFIG_PASSPHRASE=<your-passphrase>

pulumi config set oci:region <your-oci-region> #the config has us-phoenix-1 default
pulumi config set oci:tenancyOcid <your-oci-tenancy-id> --secret #encrypt your tenancy OCID
pulumi config set oci:userOcid <your-oci-user-id> --secret #encrypt your user OCID
pulumi config set oci:fingerprint <your-fingerprint> --secret
pulumi config set compartment_ocid <your-compartment-ocid>

cat <local-path-to-privateKey> | pulumi config set oci:privateKey --secret
You can find these credentials by going to the Oracle Cloud Console user interface:
- Click the Profile menu and select your user (usually your email address).
- In your profile you have an area named Capabilities, containing a link to a configuration file.
- Click the link and copy their following values:
regionwhere you wish to provision the infrastructure;tenancyto fulfill your tenancy OCID;userfor your userOcid;privateKeyto sign in the API. In case you don’t have an API signing key, checkout the steps here.fingerprintto fill in your oci fingerprint. This value is associated to yourprivateKey;
- To fill in your compartment OCID, you can see that by going to Identity in your menu.
You will also need a pair of keys to access the OCI instance securely, so let’s create and configure them too:
echo "Create cloudkey ssh keys at in the current dir"
ssh-keygen -t rsa -m PEM -f cloudkey

cat cloudkey.pub | pulumi config set ssh_authorized_keys
pulumi config set ssh_private_key_file cloudkey
You can also run all these commands together and just provide your values by running the setup.sh script.
And finally to make sure your Java project and Pulumi + OCI configuration is all correct, you can run:
pulumi preview
And you should see somethig like:
Previewing update (oci-vm-provider):
     Type                 Name                             Plan
 +   pulumi:pulumi:Stack  oci-vm-provider-oci-vm-provider  create

Outputs:
    exampleOutput: "example"

Resources:
    + 1 to create
Now let’s move forward and actually write some code and create some infrastructure (as code!).
Step 4: Build out our Infrastructure as Code
The generated project from Step 1 contains a Java class with the following content:
public class App {
	public static void main(String[] args) {
		Pulumi.run(ctx -> {
			ctx.export("exampleOutput", Output.of("example"));
		});
	}
}
This code accesses the current context and outputs exampleOutput: "example" from any given stack. In the main method, you can call Pulumi.run and pass it a method that will later construct the resources you wish to deploy:
// ...previously generated package and import lines here

import com.pulumi.context;

public class App {
	public static void main(String[] args) {
		Pulumi.run(App::stack);
	}

	private static void stack(Context ctx) {
		var config = ctx.config();
		ctx.export("exampleOutput", Output.of(config.getName()));
		//more build infrastructure code
	}
}
The config variable has access to the values from Pulumi.<stack-name>.yaml.
Creating an OCI instance requires building a few infrastructure components and placing all together in the same method would create a cluttered entrypoint.
So let’s see how we can elegantly split the responsibilities.
Represent Infrastructure with Records and Sealed Classes
The SDK provides classes to access or create infrastructure resources independently. Yet, as this Java project creates a piece of infrastructure putting together all these independent parts, it is better to describe those with language constructs that will help to this purpose:
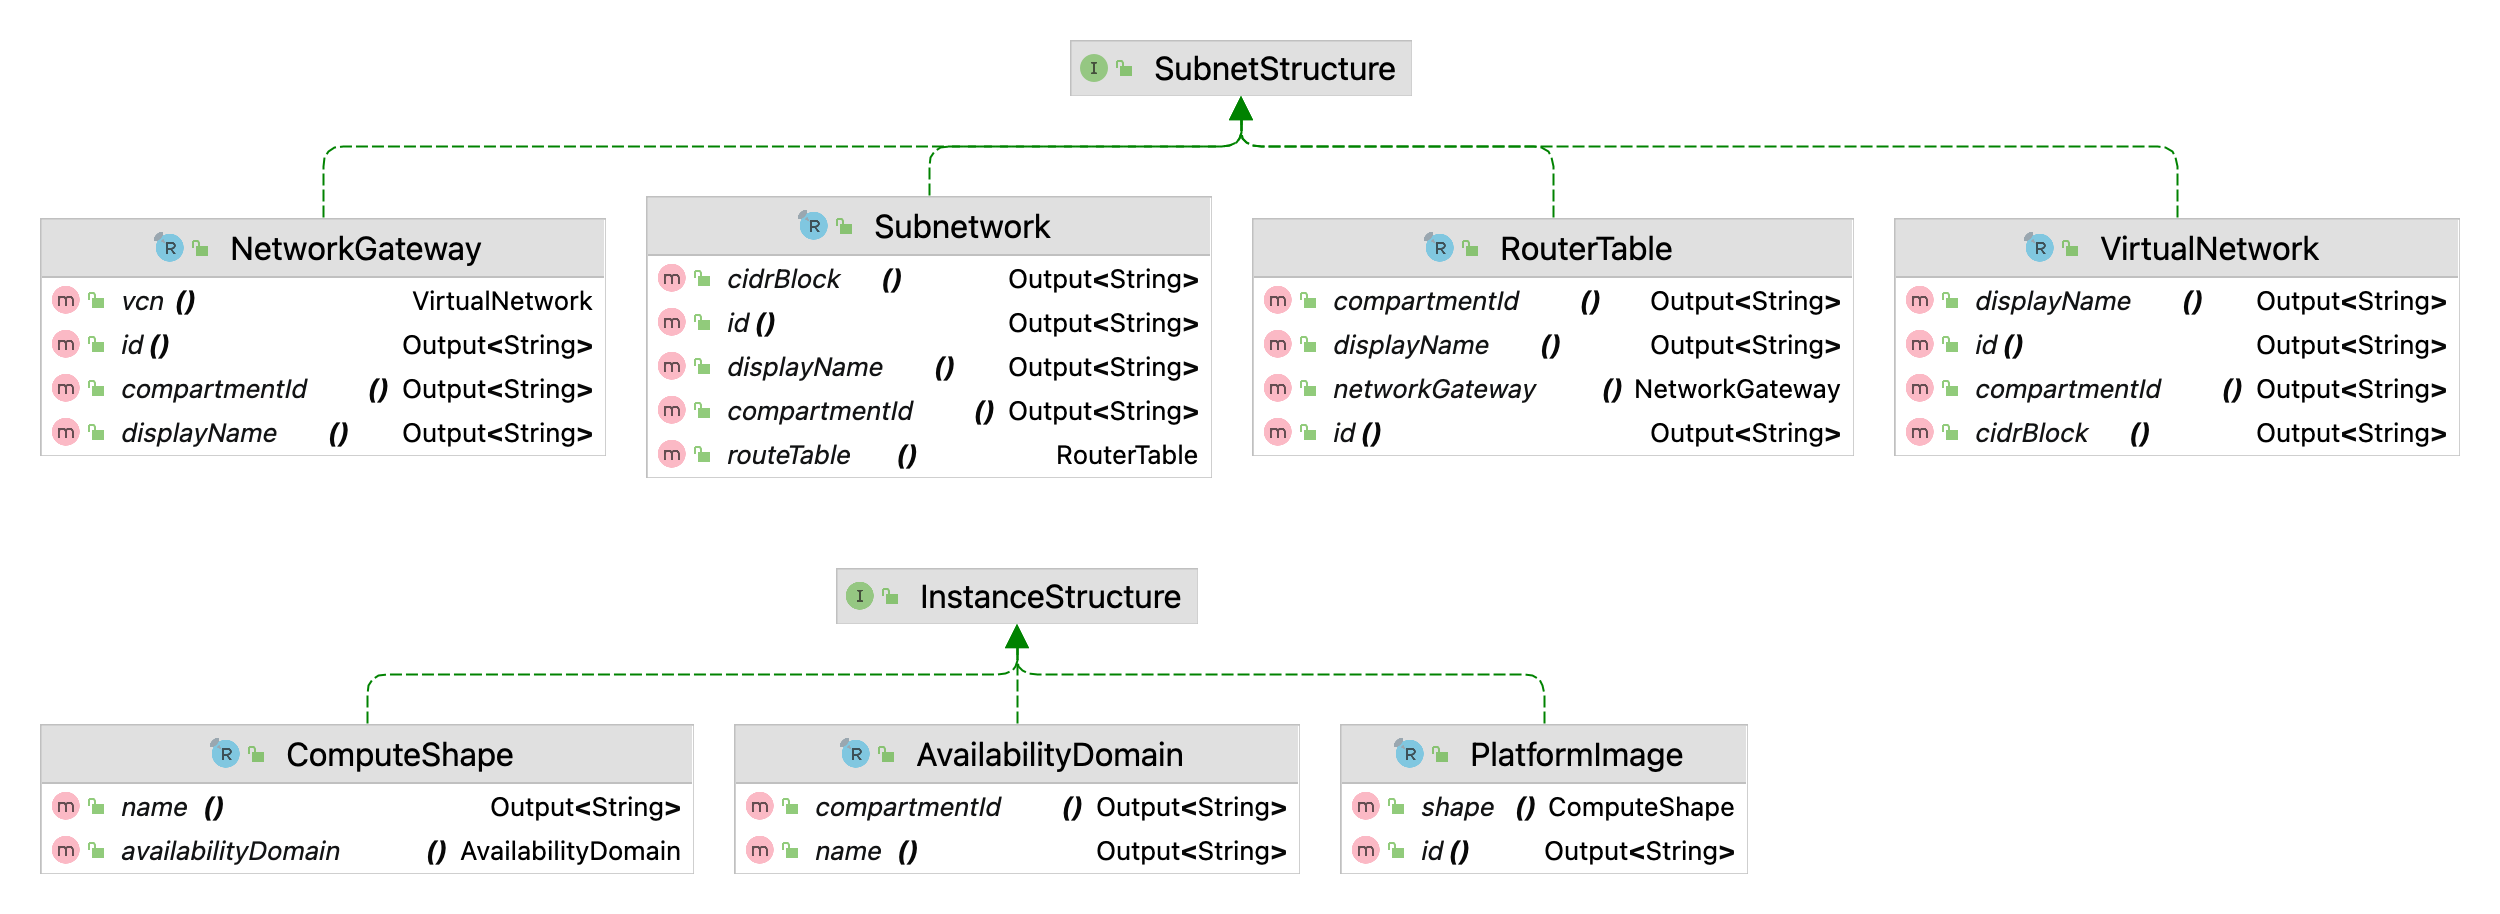 Figure 1 Project Class Diagram
To build an OCI Compute Instance you need to identify some components provided by the cloud:
- An availability domain which consists of a set of datacenters within an OCI region where your compartment and future instance reside
- A compute shape which is a template that determines the number of OCPUs, amount of memory, and other resources that are allocated to that instance
- A platform image that determines the operating system and other software for that instance
These components are related to the structure of the Instance,
hence you can choose to represent their class hierarchy as allowed heirs of InstanceStructure sealed interface:
sealed public interface InstanceStructure permits AvailabilityDomain,
            PlatformImage, ComputeShape {}
To find existing compute shapes in OCI you need an availability domain, so you can model the two components as nested record patterns:
public record AvailabilityDomain(Output name, Output compartmentId)
		implements InstanceStructure {}

public record ComputeShape(Output name, AvailabilityDomain availableDomain)
		implements InstanceStructure { }
Similarly, you could determine a suitable platform image for that compute shape, so PlatformImage is also a record containing a ComputeShape field:
public record PlatformImage(Output id, ComputeShape shape)
		implements InstanceStructure { }

public record ComputeShape(Output name, AvailabilityDomain availableDomain)
		implements InstanceStructure { }

public record AvailabilityDomain(Output name, Output compartmentId)
		implements InstanceStructure {}
An OCI instance also needs a Subnet in the given compartment.
A subnet is a logical part of a Virtual Cloud Network (VCN) that requires a few components as well:
- A
Virtual Cloud Network (VCN)described by the definition of theVirtualNetworkrecord. - Your
VCNwill need access the internet and theNetworkGatewayrecord describes that resource. - The subnet needs rules for to and from internet access and the
RouterTablerecord has aNetworkGatewayfield to represent that.
The subnet itself is described by Subnetwork record that contains a RouterTable field:
public record Subnetwork(Output<String> id, Output<String> compartmentId,
                         Output<String> displayName, Output<String> cidrBlock,
                         RouterTable routeTable)
        implements SubnetStructure {
}

public record RouterTable(Output id, Output compartmentId, Output displayName,
                          NetworkGateway networkGateway)
        implements SubnetStructure {
}

public record NetworkGateway(Output id, Output compartmentId, Output displayName,
                               VirtualNetwork vcn)
        implements SubnetStructure {
}

public record VirtualNetwork(Output id, Output compartmentId, Output displayName,
                               Output cidrBlock)
        implements SubnetStructure {
}
These records belong of SubnetStructure hierarchy as you need them to build a subnet:
public sealed interface SubnetStructure permits NetworkGateway,
		RouterTable, Subnetwork, VirtualNetwork { }
Now that you caught a glimpse to the class hierarchy, let’s look at the operations required to work with these records.
Build Infrastructure with Pattern Matching
As availability domains, compute shapes and platform images are part of the built-in Oracle Cloud Infrastructure, one would need just to find them.
In consequence, you can use pattern matching for switch to find any of these InstanceStructure records:
public static InstanceStructure find(EnumMap<Params, String> configMap, InstanceStructure instance) {
	return switch (instance) {
		case null -> findFirstAvailabilityDomain(configMap);
		case AvailabilityDomain availabilityDomain ->
                findFirstShape(configMap, availabilityDomain);
		case ComputeShape shape -> findFirstImage(configMap, shape);
		case PlatformImage platformImage -> throw
		        new UnsupportedOperationException("No operation associated to "
		            + platformImage.getClass().getSimpleName());
	};
}
Similarly, you can choose to create an instance structure via a pattern matching for switch on each SubnetStructure type:
public static SubnetStructure provision(EnumMap configMap,
        SubnetStructure infrastructure) {
	return switch (infrastructure) {
		case null -> provision(configMap);
		case VirtualNetwork vcn ->  provision(configMap, vcn);
		case NetworkGateway ngw -> provision(configMap, ngw);
		case RouterTable routeTable -> provision(configMap, routeTable);
		case Subnetwork subnet -> provision(configMap, subnet);
		case SubnetStructure infra -> throw new UnsupportedOperationException(
				String.format("No operation set for type %s", infra.getClass().getSimpleName()));
	};
}
Now let’s provision the Subnet by calling subsequently SubnetInfrastructureFactory.provision(EnumMap<Params, String> configMap, SubnetStructure infrastructure).
var config = ctx.config();
var configMap = convert(config);

var vcn = (VirtualNetwork) SubnetInfrastructureFactory.provision(configMap, null);
var internetGateway = (NetworkGateway) SubnetInfrastructureFactory.provision(configMap, vcn);
var routeTable = (RouterTable) SubnetInfrastructureFactory.provision(configMap, internetGateway);
var subnet = (Subnetwork) SubnetInfrastructureFactory.provision(configMap, routeTable);
Once you have a Subnet, use InfrastructureFinder.find(EnumMap<Params, String> configMap, InstanceStructure instance) to find the first availability domain, shape and compatible image suitable for your OCI instance.
var firstAvailabilityDomain = (AvailabilityDomain) InfrastructureFinder.find(configMap, null);
var firstShape = (ComputeShape)InfrastructureFinder.find(configMap, firstAvailabilityDomain);
var compatibleImage = (PlatformImage) InfrastructureFinder.find(configMap, firstShape);

Instance instance = InfrastructureChain.execute(configMap, "instance",  subnet,  compatibleImage);

//get OCI Instance login details to connect via ssh
var sshKeyFile = configMap.get(Params.SSH_PRIVATE_KEY_FILE);
Output<String> displayName = instance.displayName().applyValue(name -> name);
Output<String> publicIp = instance.publicIp().applyValue(ip -> ip);
Output<String> instruction  = Output.format("on instance %s you can use ssh -i %s -o IdentityAgent=none opc@%s", displayName, sshKeyFile, publicIp);
ctx.export("To login", instruction);
The InfrastructureChain class is responsible for wiring the details between Subnet and available infrastructure.
You can find the entire code of the project and instructions on how to run it by going to Github oci-vm-provider repository.
Step 5: Run our Code to Launch Infrastructure
And for the grand finalé, let’s build our infrastructure on OCI by simply running the following command:
pulumi up
If you want to deploy to another environment, easily create a new stack by running:
pulumi stack
The above command will end up creating a new Pulumi.<stack_name>.yaml where you can
store new cloud credentials, such as a new compartment id where you need to create compute instances.
When you no longer need the resources within a specific stack, you can run:
pulumi destroy
Thoughts to Ponder
While this project is easy to run from your computer, managing certificates and other secrets from your local can become a tedious operation on the long term. One possible way to evolve the current setup is to have Github workflows that execute all the command line steps provided in this article. Yet, if you search for a one time spin of resources and enjoy coding with Java, give this tutorial a try. Have fun 😉!
The content of this article was initially shared on my personal blog.